You can make your own Mosaic Crochet patterns using the Grid Designer!
Grid Designer supports the creation of patterns for Mosaic Overlay Crochet, Reverse Mosaic Overlay Crochet, Inset Mosaic Crochet and Interlay Mosaic Crochet!
What is Grid Designer?
Grid Designer is a free on-line drawing tool for making your own craft charts. Grid Designer runs in your browser! Nothing to download! Grid Designer is my retirement project after 30 years as a software developer and it is entirely free to use.
Grid Designer comes in two forms: Cloud Grid Designer and Legacy Grid Designer. Use the Cloud version to create Mosaic Crochet patterns. You can see more about the two versions here: Grid Designer
Cloud Grid Designer requires you to create a login with an email address. I do not send spam emails or share your email address with anyone. It’s a very simple process to create a login, see this video to see how to do it.
How to Create Mosaic Crochet Patterns with Grid Designer
This post will discuss how to create your own patterns for Mosaic Crochet using the free Grid Designer tool. First, lets discuss the different forms of Mosaic Crochet and how patterns for those forms look in Grid Designer.
Mosaic Crochet color patterns are created by working double-crochet stitches down over lower rows of single-crochet. These double-crochets are long stitches that add interesting texture and color to a pattern. I expect there are an infinite number of ways to work Mosaic Crochet patterns, but I have settled on supporting 4 specific types in Grid Designer.
Traditional Mosaic Overlay Crochet
Traditional Mosaic Overlay Crochet is worked over single-crochet rows of two contrasting and alternating colors. Each row is traditionally worked only from right-to-left (left-to-right if you are left-handed) and tails are left on both the right and left sides of the work. Each row of single crochet is worked in the back loop only, of the crochet below it. This leaves the front loop free to work interspersed double-crochets down over the work into the front-loops.
Single-crochets on the ends of each row are usually worked through both loops of the single-crochet below. These stitches are commonly referred to as Border Stitches.
Videos on Mosaic Overlay Crochet
If you are new to Traditional Mosaic Overlay Crochet, the best way to learn is to watch it being done. Here are a couple of videos I found on working Traditional Mosaic Overlay Crochet.
#1 Beginners Guide to Mosaic Crochet – The Basics
#2 Beginners Guide to Mosaic Crochet – The Charts
The Crochet Architect also has videos that show a continuous Mosaic Overlay technique where you bring the yarn back across the row so that you can prevent most of the tails in the work. Here is a video on that:
#25 – Continuous Overlay Mosaic Crochet with NO ENDS!
You may also want to work anchored double-crochets in your project. These are done by pulling an extra loop through the single-crochet below before working the double-crochet over it. This can help reduce gaps on the back-side of the work. Here’s a video on the anchored double-crochet stitch:
#18 – Anchored Double Crochet Stitch for Mosaic Crochet
Chart Symbols
There does not yet appear to be a solid standard for the symbols used in Mosaic Overlay Crochet charts. After reviewing different chart symbols I have decided on the following for Grid Designer:
![]() Double-crochet on right-side of work
Double-crochet on right-side of work
![]() Anchored double-crochet on right-side of work.
Anchored double-crochet on right-side of work.
![]()
![]() or
or ![]() Border Stitch
Border Stitch
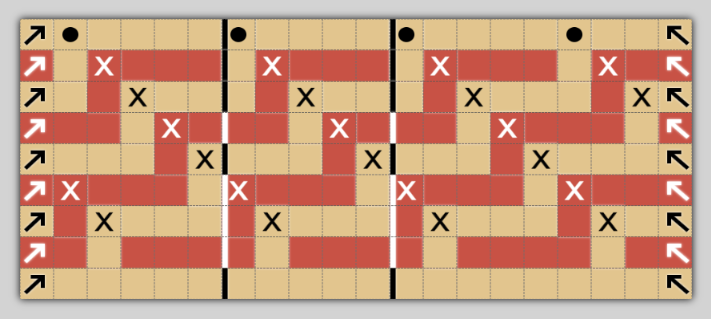
So, a Mosaic Crochet Pattern could look like this in the Grid Designer:
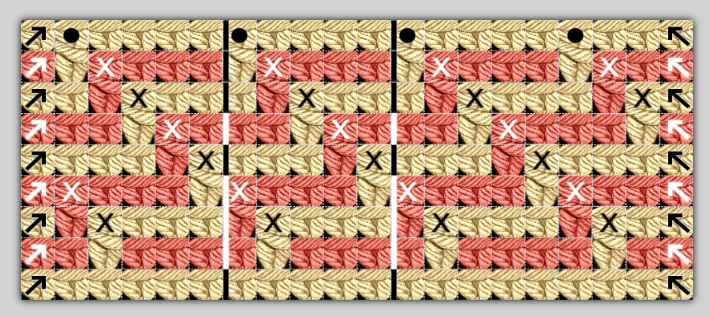
Grid Designer also has a texture option, to help visualize the crochet work. With the texture on, the pattern looks like this:
Reverse Mosaic Overlay Crochet
Reverse Mosaic Overlay Crochet is worked very much like Mosaic Overlay Crochet with the addition of one stitch, a long double-crochet-like stitch worked on the wrong side of the work. This will create a similar pattern on the reverse side of the work. I have found three different ways to do this “wrong-side” stitch:
Modified Anchored Double-crochet on the wrong side – #26 – Reversible Continuous Overlay Mosaic Crochet (REV-COM)
Lock Stitch – Lock Stitch for Reversible Overlay Mosaic Crochet
Negative Stitch – Turn any overlay mosaic crochet chart into a reversible pattern using the negative stitch!
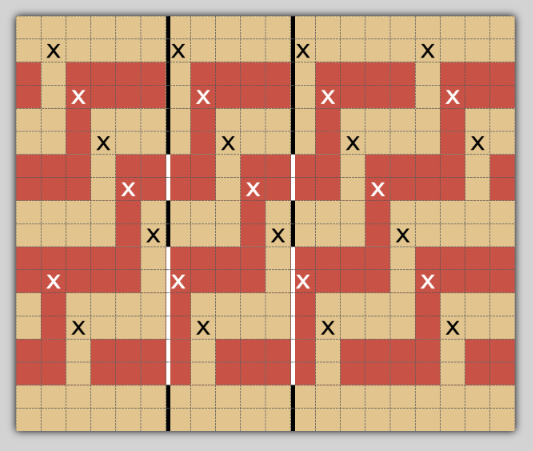
![]() Wrong-side double-crochet-like stitch, placed above each
Wrong-side double-crochet-like stitch, placed above each ![]() in the pattern.
in the pattern.
Inset and Interlay Mosaic Crochet
Grid Designer uses the Inset / Interlay Mosaic Crochet for both Inset and Interlay Mosaic Crochet.
Both Inset and Interlay Mosaic Crochet are worked over single-crochets like Mosaic Overlay Crochet. However, two rows of each color are worked. First row is worked from right-to-left, then the work is turned and second row is worked back. Each single-crochet is worked in both loops of the single-crochet below.
These two types differ in how the double-crochets (or extended double-crochets, since these now have to go across two rows), are worked.
For Inset Mosaic Crochet, chain stitches are worked in place of single-crochets where the double crochet will be worked. This allows the double-crochet to be worked in front of the chains and into both loops of the single crochet below.
For Interlay Mosaic Crochet, the double-crochet (or extended double crochet) is worked around the post of the single crochet of the same color below it.
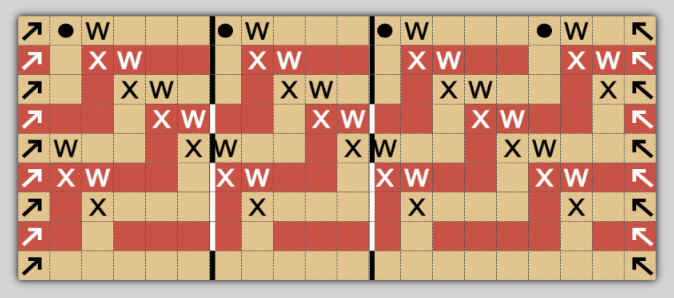
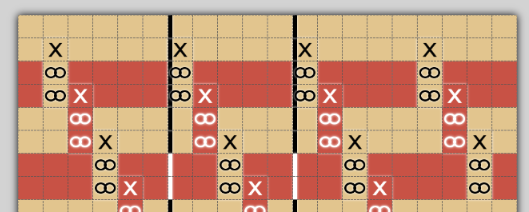
A pattern similar to the one above, done with two rows of each color would look like this:
Notice that the double-crochets (or extended double crochets) are marked with X and are only worked from the lower single crochet row for each color. Chain stitches can be added to remind yourself you are working chains behind the double crochets instead of single crochets, in the case of Inset Mosaic Crochet.
For more information on Inset and Interlay Mosaic Crochet watch these two videos:
Inset mosaic crochet (2 rows in one color, no tails) basics, tips & tricks
An introduction to INTERLAY Mosaic Crochet
Create a Mosaic Crochet Pattern in Grid Designer
Once you are logged into griddesigner at: https://www.freese-works.com/griddesigner-cloud use these steps to create and edit your own color chart or watch the youTube videos on the Grid Designer youTube channel (listed at the end) to see how to create a pattern:
To create a project:
- Select Project > New Project; a dialog will come up asking for project type, etc.
- Select Project Type of Mosaic Overlay Crochet, Reverse Mosaic Overlay Crochet or Inset/Interlay Mosaic Crochet.
- Select or enter a crochet gauge for your project. This gauge should be the crochet gauge for working a swatch of single crochet rows. You can also select an approximate gauge from the dropdown for the weight of yarn you intend to use.
- Select a palette.
- Click Create Project button.
You will then be asked for two colors to start with. These will be used to set the foreground and background colors in your project and also to create the initial striped single crochet layout for your project.
You will then be asked for a name for your project. Enter the name and select Save to save your project or select Close to continue and save at a later time. You can save at any time with Project > Save.
Your project should then be created with the initial stripes of the single-crochets.
To draw symbols:
Select the symbol you want to draw with from the Design Symbols drop-down to the right of the foreground/background color buttons on the top toolbar. The X symbol will be selected initially.

You can also select symbols from a floating palette. Select Display > Show Floating Palette to bring up the floating palette. Symbols are in the bottom section.
Select the drawing tool on the bottom toolbar (pencil with dots):
The drawing tool will turn green when active. Then, click on the chart to place symbols as you want them. For instance, place an X for a double-crochet, the chart will update to show the additional color space below the X for the double-crochet overlay.
See more detailed examples of creating and editing projects in these videos on my YouTube channel:
Mosaic Overlay Crochet Patterns in Grid Designer
Reverse Mosaic Overlay Crochet Patterns in Grid Designer
Inset / Interlay Mosaic Crochet Patterns with Grid Designer
Save, Print, Download
To save your project, select Project > Save.
To print your project, select Project > Print
To download your project as a png image or pdf file, select Project > Download,
Have a great day everyone and happy designing!!