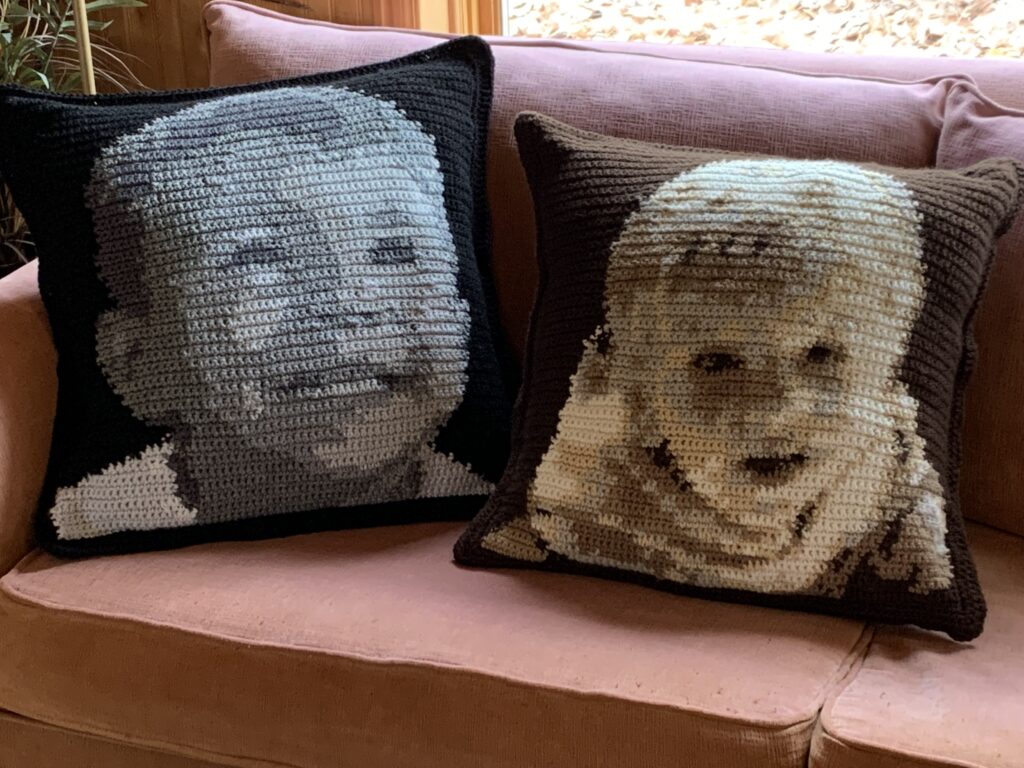
I created two graphghan portrait pillows of my two grandsons from photos! You can make your own portrait pillow graphghans from photos by following the directions in this blog post. These pillows are 24 inches square and have an opening in the back to insert a pre-made pillow insert. They use a variety of easily available acrylic worsted weight yarns from palettes I defined for the Grid Designer and are worked in single crochet with a simple double crochet edging.
What is the Grid Designer?
The Grid Designer is a new, free, on-line tool for drawing and creating colored craft charts for your own patterns. Create your own designs for knitting, crochet graphgans, C2C crochet, latch hook, cross stitch and more, using the Grid Designer! Read more about the Grid Designer. Grid Designer does not require a login or email. It is my retirement project after 30 years as a software engineer and it is completely free to use. No download is required; it runs in your browser. To see the kinds of things you can do with Grid Designer watch the overview playlist in youtube.
Basic Steps
Here are the basic steps for making a graphghan portrait pillow (more details on each step are below):
- Create the pattern for the front from a photo of your choosing. This is done with the Grid Designer; more information is below.
- Crochet the front panel using the pattern you make from Grid Designer.
- Crochet two back panels that will overlap, then attach them to the front by crocheting around the edges.
- Insert a 28 inch pillow insert and the pillow is complete!
Create the Pattern from a Photo
The simplest way to learn how to make a pattern from a photo is to watch this video showing how I created the patterns for the graphghan pillows in this blog post. Make a Graphghan from a Photo video.
The video gives tips on selecting photos and shows how to make a pattern using your choice of two palettes. One palette contains shades of grays, the other palette contains shades of brown or sepia tones.
After the pattern is created, you can save it in the Grid Designer with the Project > Save option. When you come back to the Grid Designer later, select Project > Open to see the list of saved patterns. Select the pattern and click open.
To print the pattern to a local printer, select the Project > Print option.
To download the pattern image or a PDF with crochet instructions, select the Project > Download option and select the type of download you want. If you are looking for crochet instructions written out, select the PDF option and then the single-crochet directions option. This will create written instructions in the PDF file that will download.
If you are having difficulty digitizing a photo, here is one tip that may help for some photos: Apply the Grayscale filter to the photo.
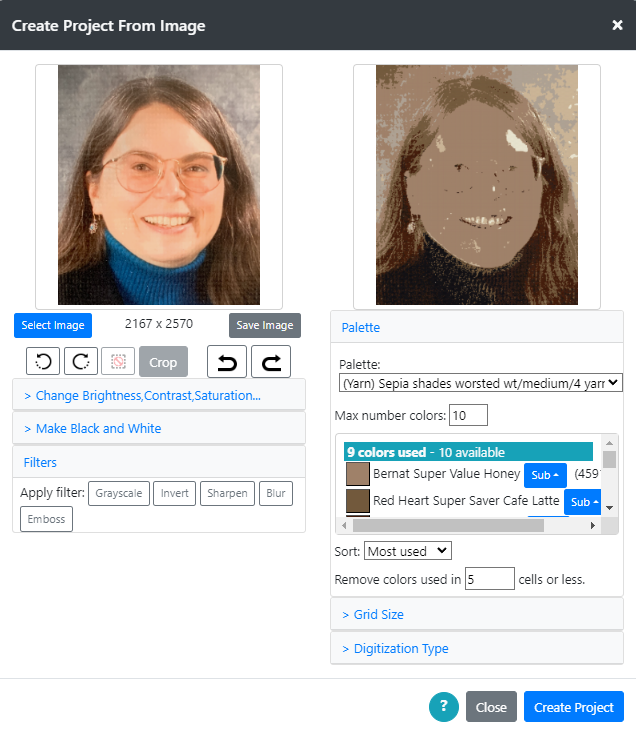
Here is an example with a photo of myself.
With this photo and the Sepia tones palette, I do not get a good picture on the right. This photo has a lot of bright light coming from the front of the picture, making the face almost the same color all the way across it.
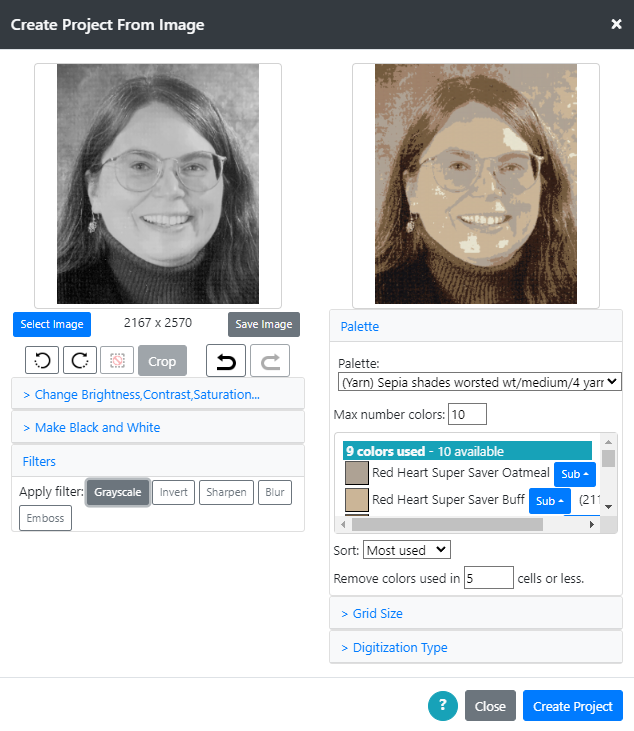
This photo is helped by first applying the Grayscale filter to the image on the left. To apply the filter, open the Filters section by clicking on Filters (bottom left). Then, select the Grayscale button to apply the filter. This will make the image on the left grayscale to begin with and can greatly help the digitizer to complete the job.
If you have problems digitizing a photo…
If you have given it a good try, but are still having difficulty with your photo, you can contact me through the Contact tab at the top of this web page. Click Contact, fill in your email address and question or statement of the problem. Then click the Submit button to send me an email. I’ll reply back and you can then send your picture to me through email and I’ll give it a try for you! No charge for any work. I am retired and Grid Designer is my retirement project.
The Contact page protects my email address from web bots and crawlers that search the web for email addresses to sell.
Crochet Pillow Top
Once you have your pillow top pattern, you need to crochet it using the yarn indicated. The list of yarns, brands and colors are listed on the pattern PDF and on the pattern key. Both, can be downloaded from the Project > Download option. Or you can print both with the Project > Print option.
You can add dark lines to separate sections of the printed grid, such as every 5 or 10 cells, or add symbols to print over colors on the pattern image. To see more about printing and download, see the video: Printing and Download in the Grid Designer.
When crocheting the pillow front, you may find the project is fairly complicated to crochet. Click here for a few tips for crocheting more complicated graphghans.
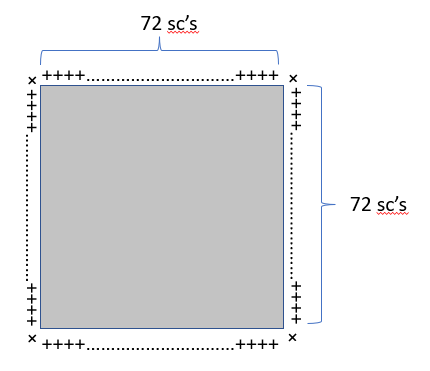
When the pillow front is done, make a row of single crochet all around the edges. Each side should get the same number of single crochets, so this means you will need to reduce on two sides.
For me, my front panel was 78 rows tall and 72 stitches across. I worked 72 stitches on each side plus an extra single crochet in each corner. On the sides, I worked 72 stitches into 78 rows by crocheting two rows together into one single crochet every 11 rows. I worked this out by taking 78 rows divided by 7 sections (6 decreases). 78 / 7 = 11.14 or 11 rows between each decrease.
Crochet Back Panels
Once the pillow top is completed, we need to make two overlapping panels for the back. Each of these panels will be about 2/3 of the height of the pillow top and will be the same width as the pillow top.
For my pillows, using my crochet gauge, the pillow top was 78 rows high and 72 stitches wide.
To get the height of a back panel, I multiplied 78 by 2/3. Or a simple way to do it is to first multiply 78 by 2 (2 x 78 =156), then divide that by 3 (156 / 3 = 52). So each back panel needs to be 52 rows tall and 72 stitches across.
For your pillow, you will need to do your own math to figure out how large the back panels will need to be, then crochet two panels in single crochet.
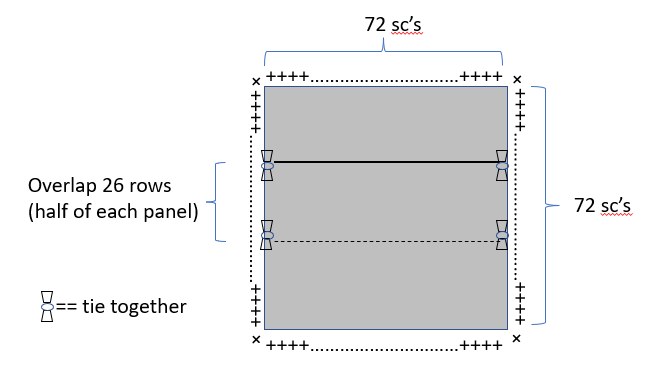
In order to make it all easier to assemble and attach to the front, I then overlap these panels, tying them together in a couple of places on each side, then single crochet all around them, making one single piece with the open overlap in the center.
The goal is to do single crochet all around them, so that the number of single crochets around the back matches the number of single crochets around the pillow front. Then, it will be easy to crochet the front to the back.
Lay the panels over one another so that the entire height is 78 rows tall (or the same height as the original front). For my pattern, that would be overlapping 26 rows. The overlap area will be about 1/2 of the back panel size, if you worked the back panels to be 2/3 of the height of the front.
Single crochet around the two overlapped layers, When working up the sides, single crochet through both layers of the two back panels where they overlap, to put them together into a panel that is the same size as the front. Reduce sides in the same way as you reduced when single crocheting around the front.
When reducing in the area of the overlap, it is virtually impossible to do a normal decrease, so I use this method when decreasing in the thicker areas. Put hook through first row space, yo, pull loop through, put hook through next row space, yo, pull loop through, (2 loops on hook), yo, pull through both loops and count as one sc.
Attach Front to Back
At this point you may want to work in all the tails on the front panel, as once you attach it to the back it will be harder to do this, so I suggest working in all the tails on the front panel at this point.
Lay top panel and back panel together with the right sides out. Single crochet around the edges working 3 SCs in each corner.
Then, work DC all around, working 5 DCs in each corner. End off.
Work in tails, insert the pillow insert and you are done!
Want to share your work?
Want to share your work? I would love to display your work at the bottom of this page! Send me an email by filling out the Contact page (click Contact at the top of this page). Then, you can send me a picture of your work that I can display here!

Some beautiful work by C.R of a family member!
Hello ma’am,
I am super excited to have come across your video on YouTube. I am a crocheter and trying to make a graphgan sweater for the very first time. I’m finding it a bit hard to use my picture to do it. Can I send you my picture please?
Hi Winifred, You can contact me through the contact tab at the top of the page. Sorry I didn’t see this comment sooner… unfortunately, There are too many people posting a lot of spam that I have to sort through.