In this post I will discuss some techniques you can use to make more complicated graphghans. The Grid Designer can be used to digitize photos into graphghan patterns. However, the patterns generated will be more complicated to crochet into a graphghan, even after being cleaned up. Most likely the graphghan will need LOTS of bobbins and some special crochet techniques to carry yarn forward and backward along the row.
What is Grid Designer?
The Grid Designer is a new, free, on-line tool for drawing and creating colored craft charts for your own patterns. Create your own designs for knitting, crochet graphghans, C2C crochet, latch hook, cross stitch and more, using the Grid Designer! Read more about the Grid Designer.
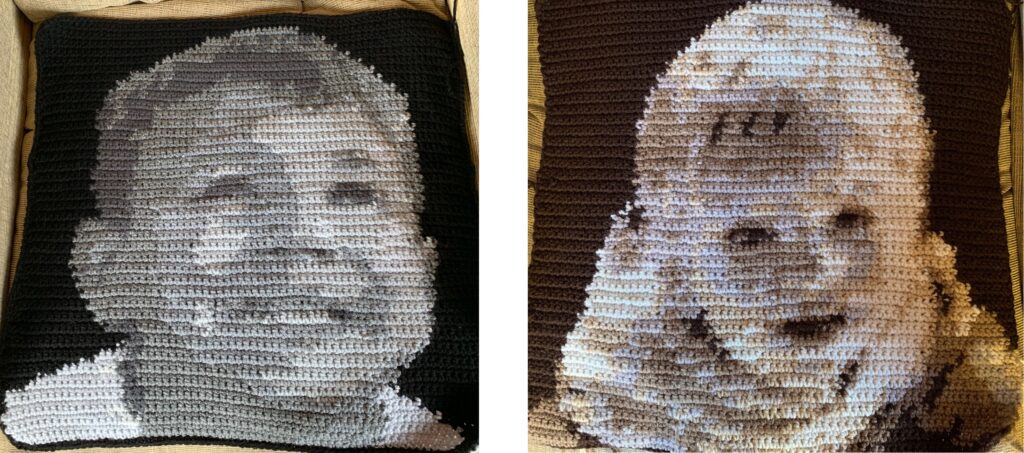
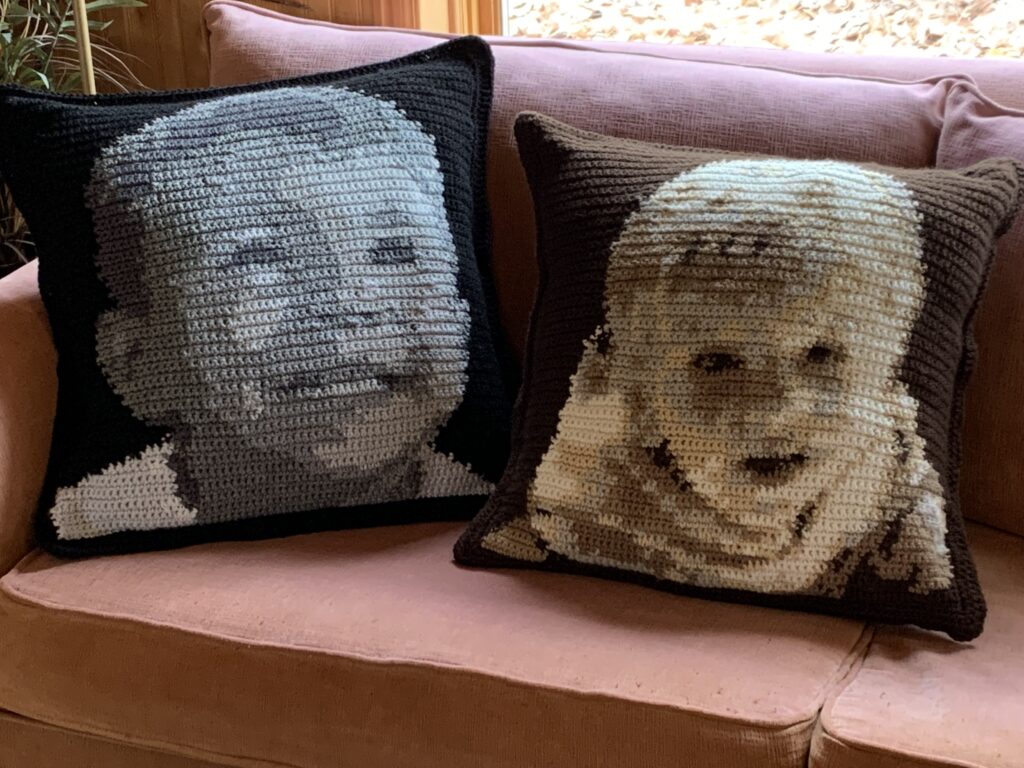
Grid Designer was used to digitize photos to create the graphghan panels shown at the top of this page See how in this youTube video: Make a Graphghan from a Photo. I then used these graphghan panels to create pillow-tops as in the picture below. See this blog page for directions on how to make these pillows: Portrait Pillows.
Prerequisites
When writing this post, I will be assuming that you, the reader, have made a single crochet graphghan before. You may have made something simple with 3 or 4 yarn colors on bobbins. You should have an understanding of basic crochet and the single crochet stitch. You should understand what a yarn bobbin is and how it is used in a single crochet graphghan. You should understand how to change colors when doing single crochet.
If you are not familiar with these, I suggest you take a look at some of the many videos on YouTube that show how to single crochet and how to make a single crochet graphghan. Make a simple graphghan before attempting to do a complex one with many colors and bobbins.
What I do differently
It is typical in single crochet to ignore the turning chain at the beginning of the row. Click here to see a post that contains a list of when the turning chain counts as a stitch and when it does not. Basically, single crochet and half double crochet generally do not count the turning chain, while double and treble crochet count the turning chain as a stitch. However, it is still a matter of opinion as to how you want to work it.
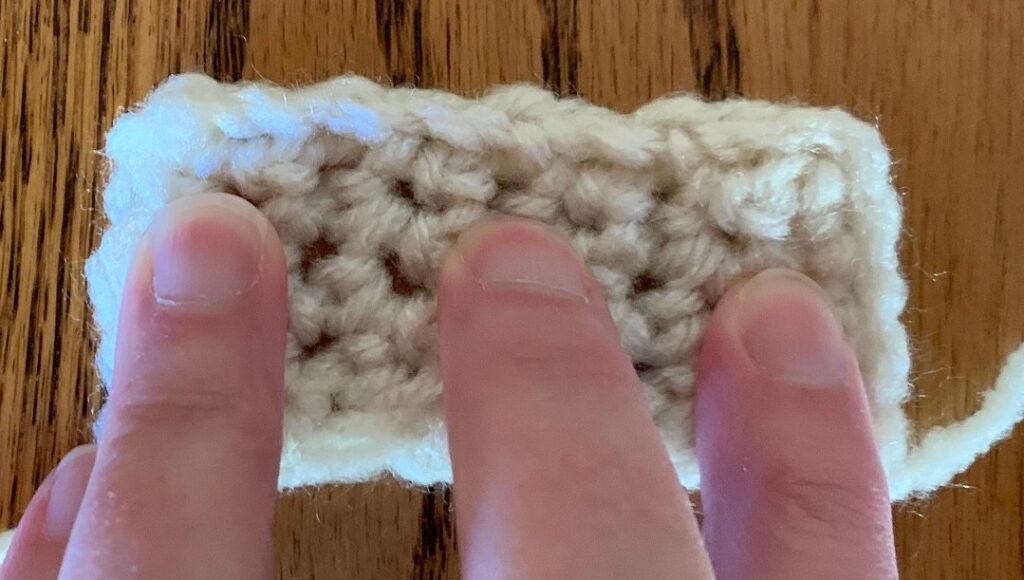
I have always counted the turning chain as a stitch. I do this because I like the final result better. To me, the edges are straighter when I count the turning chain. Here are a couple of pictures I crocheted to show what I mean.
Counting turning chain as stitch
This sc sample is 5 stitches across. Each row contains a turning chain followed by 4 sc’s. The edges come out very smooth and the piece is very rectangular.
NOT counting turning chain as stitch
This sc sample is 5 stitches across plus the turning chain. Each row contains a turning chain followed by 5 single crochets. For me this results in a bumpy edge that I have never liked.

So, for me, chaining at the beginning of any row of crochet counts as the first stitch.
The instructions that the Grid Designer writes out for crocheting a single crochet graphghan are written counting the turning chain as a stitch. If you would like me to add alternate instructions where the turning chain is not counted, leave me a message. I am always open to modifying or adding features.
Changing colors in the middle of the row is simple, always add the next color in when you have two loops on your hook. The single loop that results from doing this will visually become the top of the next single crochet.
Usually, in graphghans, you don’t have to switch colors on the end of rows, but if you do, when counting the turning chain as a stitch, these rules apply:
- If you have to switch colors in the first stitch of the next row, pull the new color through the last single crochet of the last row, when you have two loops on your hook.
- If you have to switch colors on the second stitch of a row, then the ch1 at the beginning of the row must be in the new color. That ch1 will visually end up on top of the next stitch (the first single crochet you work in the row). This is the only time you would ever change colors by pulling the yarn through a single loop. In practice, I rarely bother to do this, as the edge is usually worked over by a round of single crochet going around the graphghan and the edge is not very important to the pattern. I usually just make the color switch when going to the next row as in #1 above and just skip the color of the first square in the graph in that row.
If you are NOT counting the turning chain as a stitch, then the turning chain should be the color of the first stitch for the row. If this color is a new one, pull it through the two loops of the last single crochet in the previous row, ch1 and do the first sc, all the same color.
Advanced Techniques
Here are some ideas for helping with complex graphghans with many color changes and bobbins.
Don’t Attach Yarn from the Original Yarn Balls/Skeins
Many of the videos I have seen on graphghans also work from the original yarn ball, so that the ball is always attached to the work. When you are doing something more complicated and there are many, many bobbins, having yarn balls attached when you need to turn your work makes things much more complicated. So, I do not pull yarn directly from the original yarn balls/skeins. I put ALL yarn on bobbins. Larger bobbins for larger areas.
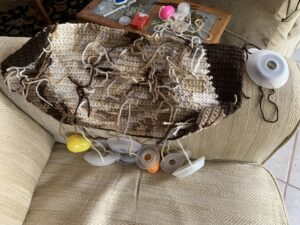
Then, when I want to turn my project, I can pick the entire thing up, with the bobbins hanging straight down from where they are attached and simply turn the entire thing. This makes the work much easier. Bobbins may twist around each other a bit, but they don’t get all tangled into a big mess. Having all yarns on bobbins greatly simplifies the work where turning is concerned. There may be a few more tails to work in, but that is a small price to pay for keeping the yarn straightened out.
If you are wondering what the Easter eggs are for, they are explained in this post: https://freese-works.com/free-knitted-christmas-stocking-pattern-with-lining/
Don’t Count Bobbins
The graphghan tutorials I have seen treat the graphghan as intarsia crochet. The basic technique is to look at the pattern first, determine how many bobbins you will need by looking for places in the pattern a single color yarn will need to split. When you are looking at a simple pattern, this is fairly easy to do. But, when the pattern becomes complex and there are many yarn colors used in many places, I find this becomes tedious and difficult.
So, I never count bobbins at the beginning of the project with a complex pattern. I have my bobbins on hand and make them when I need them. If the main yarn balls/skeins are not attached to the project, it is easy to wind a bobbin when you need it.
Work From the Graph
Working from the graph rather than from written instructions can be extremely helpful when working on a complex graphghan. When you are working with written row directions, you are in the dark about what is in the next row or what was in the last row. When you work with the graph, you can see all of the rows together and you can see where you can pull a yarn color from or where you would have left a yarn color that you can pick up again.
You will see the pattern as areas of color, rather than specific directions. With a complicated graph, it is much easier to work from the graph, as it provides you with more information on how color areas are related to one another, etc. As you are working, you will be able to see where you will be able to use a color in the next row or where one came from in the last row. I greatly prefer working this way.
I know there are people out there who have difficulty with reading the graph and prefer the written instructions, but I suggest, that even if you use the written instructions primarily, you glance at the graph from time to time to see the bigger picture.
Use Other Colorwork Techniques
Graphghans are taught primarily as intarsia colorwork. You have a bobbin of yarn for each color change in the row.
I do a lot of tapestry technique in complicated graphghans. Here is a video explaining the differences between the techniques (intarsia and tapestry).
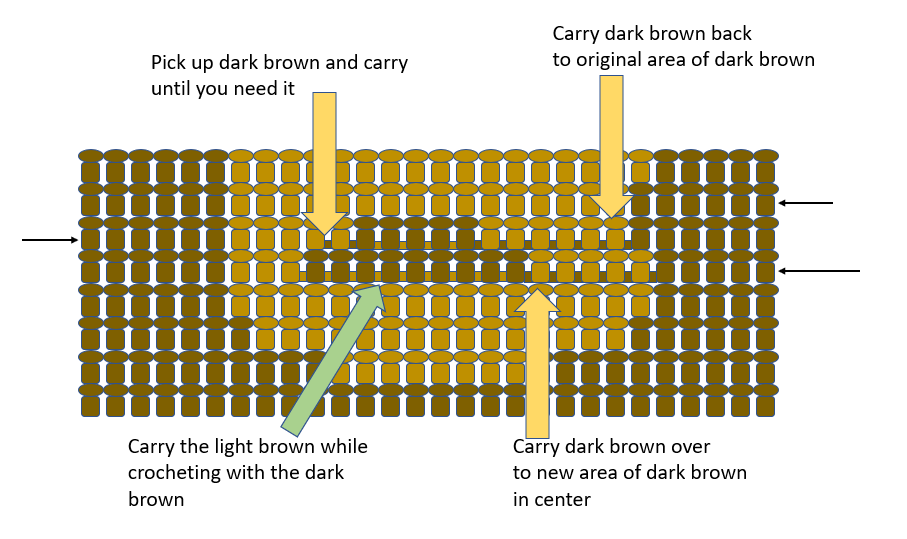
I like this video, although it does not quite go far enough. In the video she carries the dark brown yarn along while crocheting with the light brown yarn. Now, watch it again and imagine that you have a small area of dark brown to do in the middle of the light brown. You can pick up the dark brown and crochet, carrying the light brown along. Then when the dark brown is done, simply drop it and continue with the light brown. You can pick it up on the way back, crochet more dark brown if needed, then carry the dark brown along until you get back to the original dark brown area. In this way, you can eliminate the use of a bobbin for the dark brown area in the center.
Here is a diagram showing what I mean. In this diagram we can eliminate the use of two bobbins: one for the dark brown in the center and one for the split in the light brown yarn where it is crocheted on either side of the dark brown spot. The black arrows indicate the direction of crochet on each row.
There are an infinite number of possibilities. How you decide to work it, is really up to you.
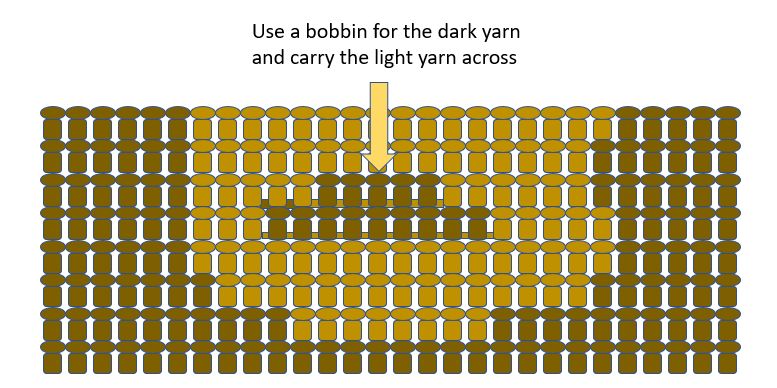
You could also eliminate just one bobbin for the light brown yarn that splits by doing this:
How much the carried yarn will show through, depends upon the type of yarn, difference in the colors and how tightly you crochet. In the pillow tops that I crocheted, shown at the top of this page, I crocheted fairly tightly, and the colors were very similar, so I was not worried about yarn showing through. I made a lot of use of tapestry crochet in them. What I usually will not do is crochet a very dark color behind a very light color, as this will make the light color look darker in spots. For instance, I would crochet white behind black, but not black behind white.
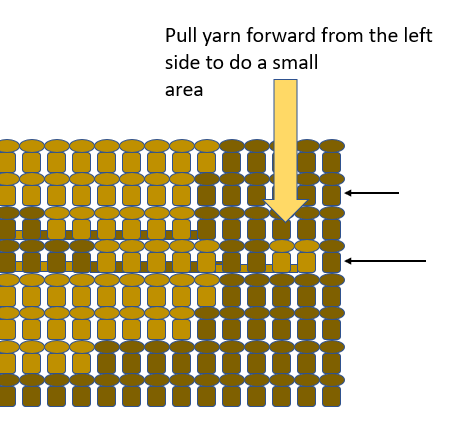
If you have an area of a color that occurs a few stitches before where you have used it, you can pull that color forward and crochet over that. Here is a diagram:
I have not seen this in any video on YouTube. It may be there somewhere, but I could not find it. Here is a video showing how this is done:
More Info
See the Overview playlist on youTube for more information on the Grid Designer.
If you are ready to start the Grid Designer to create your own project, click here.
As always, if you have any questions or comments, leave me a message below or go to my contact page to email me.
okay so first I LOVE this. I’ve been crocheting for 26 yrs and I’ve always had to have someone else make my graphgan patterns for me, so being able to do them myself is going to be a game changer. I do want to know if there is a way to get the row by row written instructions as I use both them and the graph. Thank you
Written instructions are provided when downloading a PDF. Select Project > Download. Select features for the graph, click Download. Select PDF. Select what you want in the PDF. Open the Written Instructions section to set options for written instructions. Click Download.
Depending on your browser settings the file will either download to the downloads folder or the browser will prompt you for where to place it on your device.