

Create a custom latch-hook rug for a little one with their own name on it! Here’s how I made the pattern using the Grid Designer and how I made the rug. (You can open the pattern in the Grid Designer by clicking the small rug picture on the right.)
To see how I created the pattern in the Grid Designer, watch the YouTube video by clicking here, or read on.
To see how to load and edit the free pattern here, watch this video: Customize Children’s Name Rug.
What is the Grid Designer?
The Grid Designer is a free drawing tool for creating craft color charts and it runs in your browser (chrome, MS edge, firefox, safari supported). I am a retired software developer, and Grid Designer is my retirement project. I hope you enjoy working with it! It is completely free. No login or email required, just a modern browser to run it in!
Background
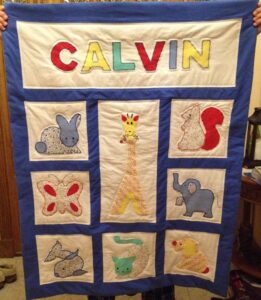
For my oldest grandson’s first birthday I made a quilt with animals on the squares and his name in large letters at the top. One of the animals I drew, and the rest I added from an old book, “Reader’s Digest, Complete Guide to Needlework”.
This book has served me well over the years. The binding is coming apart in places now, but it is still my first resource when looking up just about anything needlework related. I know that almost everything is now on the web and is only a google away, but in a lot of cases I still prefer a good old-fashioned book that I can hold in my lap.
In thinking about my first project using the Grid Designer, I thought it would be nice to make a matching rug, that could be placed next to my grandson’s bed. Young kids love to see their name written out, and my grandson, who is now 2, recognizes his name and knows the names of most of the letters.
So, I decided I would make a latch-hook rug with his name. This will also make a good example of the use of the text tool in the Grid Designer.
Latch Hooking Revisited
The first thing I need to do to get started is to update myself on latch-hook rug making. I have not made a latch-hook rug for over 30 years, since my son was born. So, I am a bit rusty. Also, that rug was created from a kit with all of the instructions and materials contained in it. This time I will be creating the rug from scratch, purchasing my materials and finishing it all myself.
Here are a couple of the sites I visited to get re-acquainted with latch hooking:
- How to Make a Latch Hook Rug – good explanations for how to start from scratch and make your own design – free gingham check rug pattern that looked really cute.
- Utterly Hooked Designs – Good close-up YouTube video of working the latch hook – sells latch hook designs, another video on finishing the back with rug binding.
Latch Hook Mesh
It appears that the first thing to decide, is the mesh that I will be using. From what I can find online, rug canvas generally comes in three sizes: 5-mesh, 4-mesh, and 3.75-mesh. The number indicates the number of holes per inch. 5-mesh was my choice, as I think that will be a denser rug, which I think will be nicer.
I purchased a 40 x 60 inch piece of 5-mesh from Color Crazy on Amazon. The rug will be 36 inches wide and whatever height it needs to be, to look the same as the top of my quilt. The 36 inches will give me 2 inches on each end to fold over for finishing, if I place it across the 40 inch width of the canvas.
Rug Size
Now I need to figure out how large the rug should be exactly. I want the proportions to be the same as the top of the quilt, but the rug doesn’t have to be exactly the same size. Looking back at my notes when I created the quilt, I can see that the name area, with 2 inches of blue on all sides, was 14 inches high and 38 inches wide. The rug will be a little smaller, being only 36 inches wide. I just need to compute what the height will be.
I suspect that this same problem comes up for lots of crafters when we are trying to resize something larger or smaller, so rather than just print out my calculations, I wrote a small ratio calculator and added it to the Help menu in the Grid Designer.
I’ll explain the steps I took in the Grid Designer to do calculations and design the rug below. More detail can be found in my YouTube video, “Children’s Latch Hook Name Rug Pattern”. You can start the Grid Designer by clicking here.
If you would like to start with my pattern and make changes from there, watch this youtube video: Customize Children’s Latch Hook Name Rug Pattern. The pattern can be loaded by clicking here, then click the Load Project link in the page that follows. This will start the Grid Designer in your browser. When it asks if you want to the load the project, click the load button and the project will be loaded and ready to edit in the Grid Designer.
Ratio Calculator

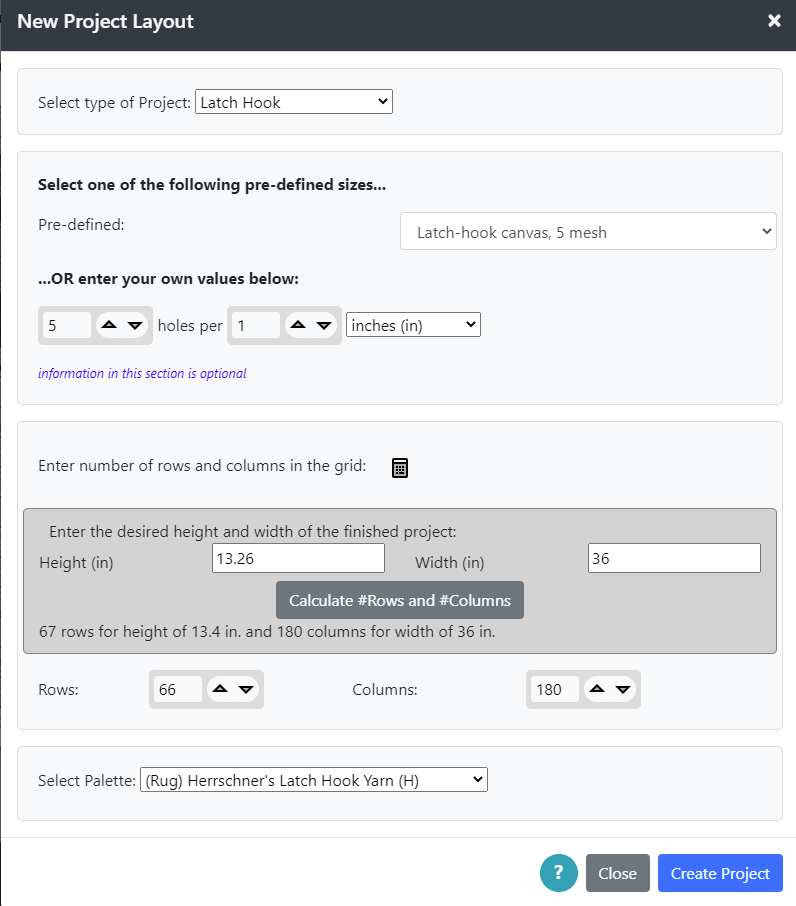
The general problem that the ratio calculator solves is this: Suppose you have an existing rectangle of a given size, like my 14 x 38 inch name area on the quilt. Now I want to make a new rectangle, the rug, where the width will be 36 inches. What will be the height of the other side of my rectangle? I need a <?> x 36 inch rectangle for the rug.
To solve this problem, select the Ratio Calculator from the Help menu in the Grid Designer. This will open a dialog, shown on the right. The first height and width values are for the existing rectangle, so I’ve entered 14 and 38. The second height and width values are for the new rectangle. Here I have entered the 36 for the width. Now I press the Calculate button, and the height of the new rectangle comes up to 13.26 inches. So my new rug will be 13.26 x 36 inches and will be the same proportions as the name on my quilt.
Create Grid Designer Project
Now, I want to create a new project with a grid that will be equivalent to 13.26 x 36 inches, if I use a 5 mesh canvas. This calculation can also be done in the Grid Designer.
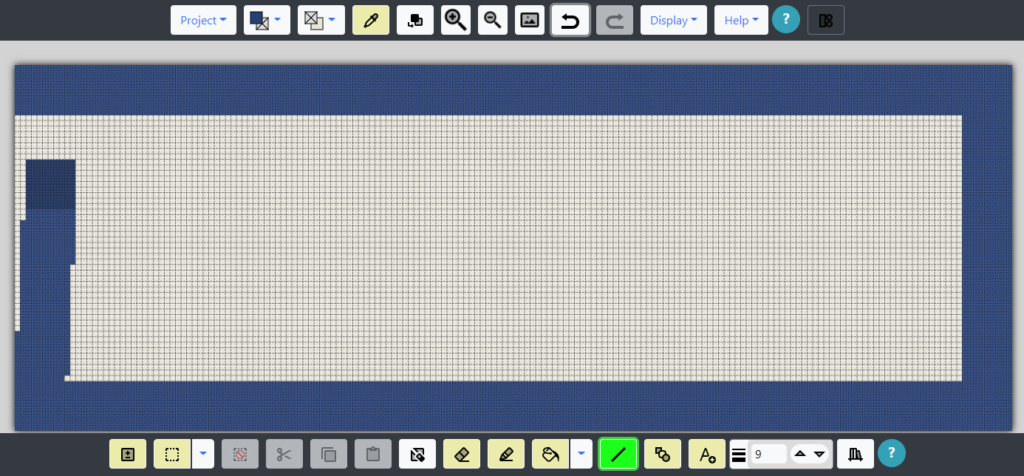
Selecting Project -> New Project, I get the dialog shown at the left. I select Latch-hook as my project type and 5 mesh from the Pre-defined sizes dropdown.
To figure out how many rows and columns my grid will be, I click on the calculator icon above the rows and columns fields and enter the desired height and width of my rug, 13.26 inches by 36 inches. Press the calculate button and it tells me that I will need 67 rows and 180 columns in my rug grid. It says that 67 rows will be 13.4 inches, one less row would be fine. I’ll go with 66 by 180 for my grid. I change the 67 to 66 in the Rows field.
I select the Herrschner’s Latch Hook Rug Yarn, this is pre-cut yarn sold by Herrschners.com.
Then I click the Create Project button and my grid is created.
Set Background Color
Now the colors in the foreground and background dropdowns will be updated to show the colors in the palette we have selected. A new foreground and background color will be selected from those automatically.
Since most of the cells will be white, I select white as the background color. Then, I select Select All and then the Clear All button. You can also click the Clear All button without making a selection first, since we are starting a new project.
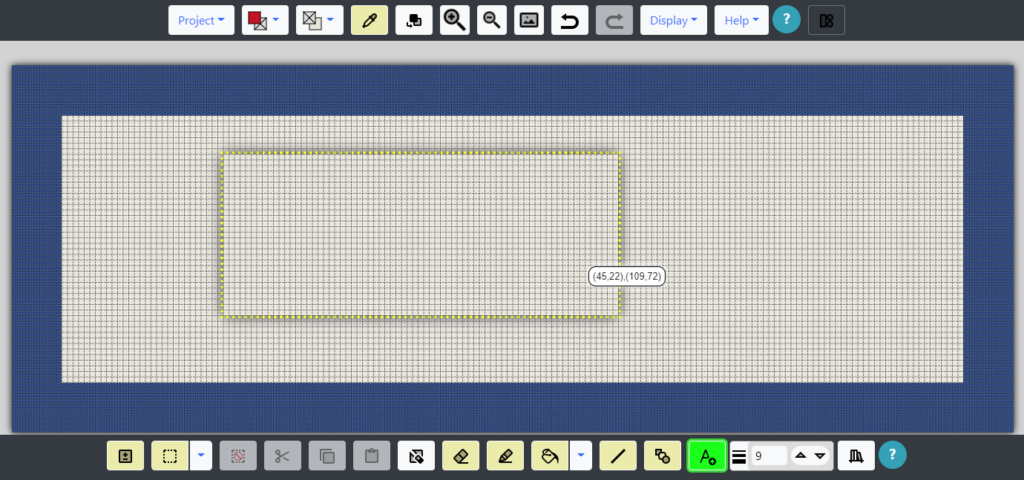
Now I want a blue border around the outside as in the quilt, but I want the proportions to be the same as the quilt. Using the Ratio Calculator again under the Help menu, the top rectangle for the border on the quilt was 2 x 38 inches, so I use that for the original rectangle. Then, I put in 36 for the width and press calculate, the other side would need to be 1.89 inches on the rug. 1.89 inches divided by 0.2 inches per row, for my 5 mesh is 9.45. I think 9 rows will be close enough.
Draw the Border
In the Grid Designer, then, I need to draw a solid blue border that is 9 rows (or columns) wide all around. There are many ways this could be done, but the simplest is probably to just draw lines that are 9 cells wide on all edges.
First we set the foreground color to Dark Cornflower. Then set the line width (bottom right) to 9. Select the line tool at the bottom of the screen and draw lines across the top and bottom, as well as the right and left sides.
The blue border is done ( the picture above shows me drawing the last side ). Now is a good time to save the project, since we have some work to lose if we do not save. So I save the project here, using the Save option from the Project menu and giving the project a name.
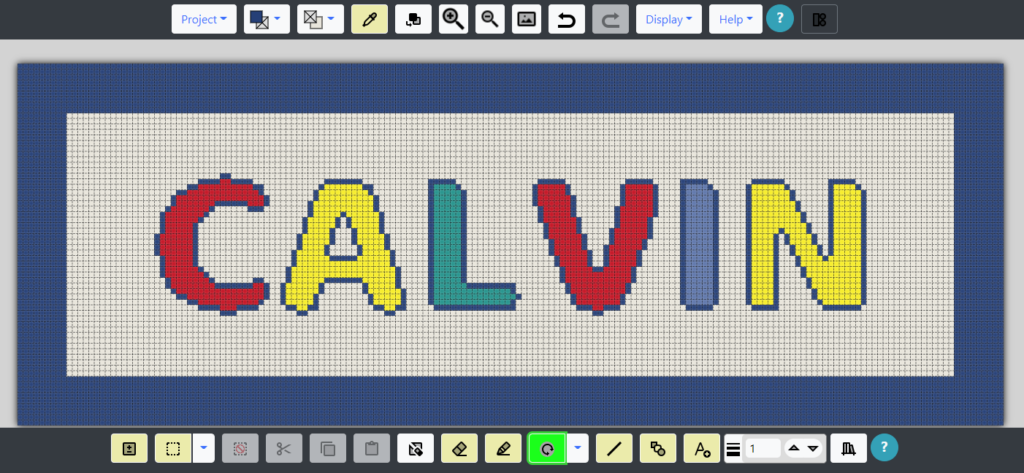
Draw Text
Now we need to add the name text in the center of the rug. The text will be drawn using the foreground color. Eventually we want each letter to be a different color as in the quilt, but initially we need to select a color for the text tool to use. So, I select Bright Red. I also want to see mouse position information as I am moving the text around, so I select Show Mouse Position from the Display menu.
Next select the text tool button. If this is the first time you have used the text tool, a hint dialog will popup to tell you to select a rectangular area on the screen to place your text.
This area will just be the initial area for the text to appear in, it can be moved and resized later. So, I select an area for the text (above). When I have dragged a rectangle onto the grid and let go of the mouse at the end, the text buttons will appear at the bottom of the display. On the left side we can enter the text we want to use. Here I enter CALVIN (below). The text will automatically draw in the paste box on the grid when you finish typing.
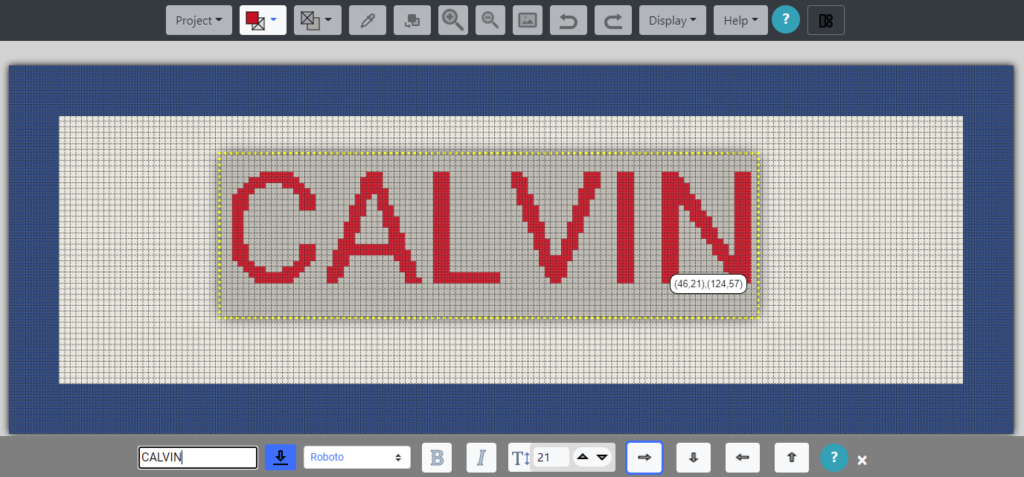
Here you can select different fonts, some have bold and italic options and some do not. You can change the height of the text with the up and down arrows or by typing the height in. There is a minimum of 7 for the height of the text. Most fonts require a larger height, more around 20 cells to be fully legible in digitized grid form. After trying out several fonts, I decided on Baloo font at 30 height.
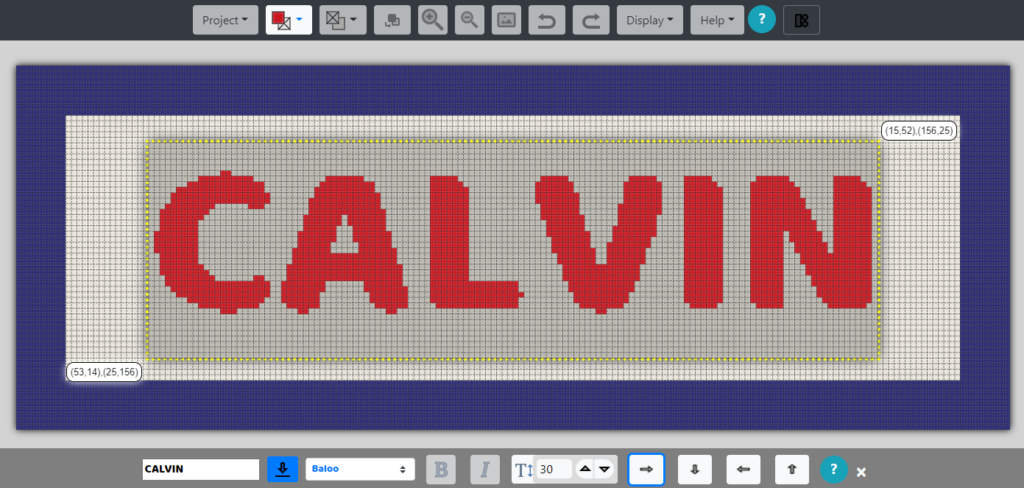
Center Text
Using the mouse position bubble that will appear on the sides of the text item we can center the text in the grid. This is best shown in the YouTube video. Use the column values on the rectangle as it is moved to center the text horizontally. Since the text is contained in a rectangle that might include lower case letters, the vertical centering of the text in the rectangle is not exactly what I would like. Moving the mouse over the rows at the top and the bottom, I can see what rows the red letters actually extend to. I can use this to further center the text vertically. When ready, I click the blue Apply button to apply the text to the grid.
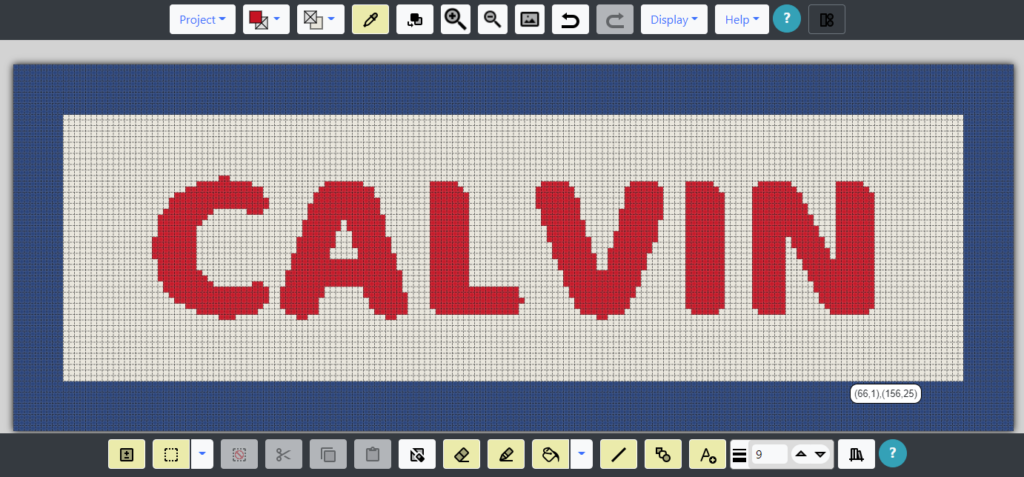
This will bring us back out into the main editor(above). Now we can use the fill tool to change the colors of the letters to be close to those on the quilt. Bright Yellow for the A and N, Medium Aqua for the L, Light Cornflower for the I.
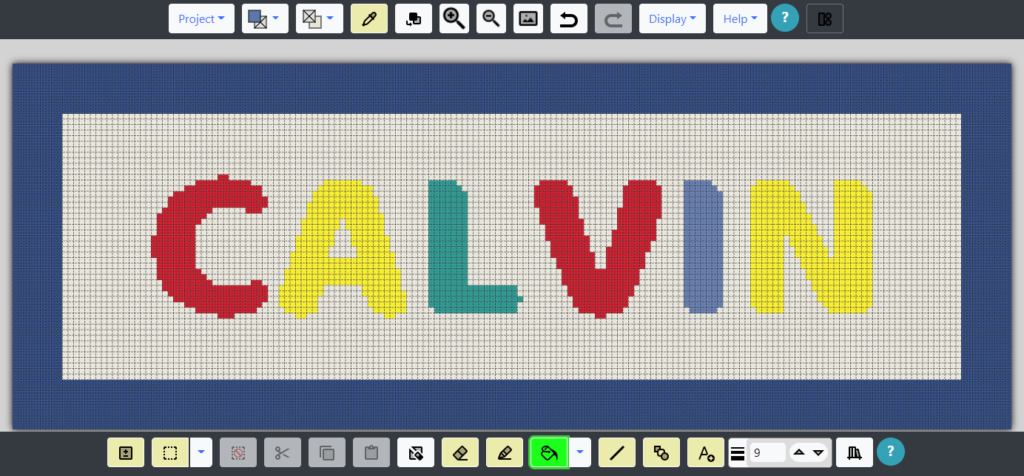
Outline Text
The letters need a little edging to make them stand out and the quilt has some blue stitching around each color. I select the Dark Cornflower for the foreground color and use the outline tool to outline each letter. The outline tool can be selected by clicking the arrow button on the right side of the fill tool. This will display a popup where you can select the outline tool.
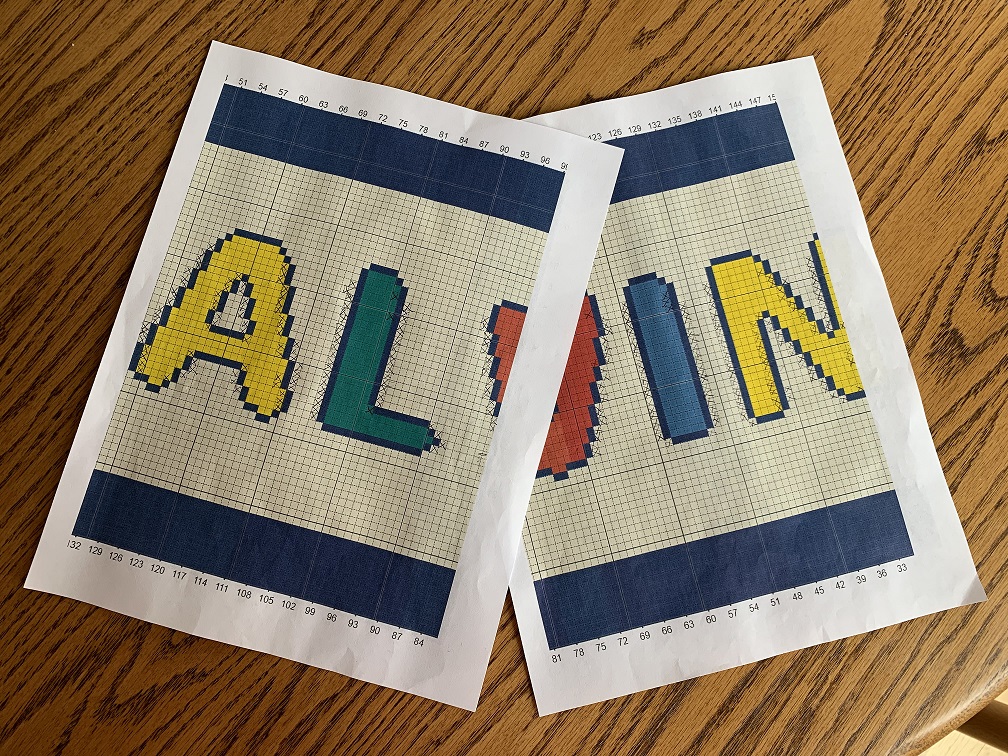
Print the Pattern
All done and ready to go. More detail on the steps in the Grid Designer can be found in my YouTube video, “Children’s Latch Hook Name Rug“.
You can download a copy of my Grid Designer project with this link. Just click the Load Project link, then the Load button when asked, and then select Project ->Print to print it out. You could also edit it to change the name, and make your own rug from that! This YouTube video shows you how to open and edit the pattern: Customize Children’s Name Rug.
I saved and printed the project from Grid Designer. At the bottom of a Grid Designer print-out will be a list of colors and the number of cells each color is used in. Now it’s time to purchase the yarn.
Purchase Materials
When working with any tool on-line we need to make sure that the representation of the color is exactly what we want. Many factors go into the display of a yarn color on your computer or tablet screen. The lighting of the initial photography of the yarn, possible processing of the image, the selection of exactly what color in the photo of the yarn is the color to display, and then the brightness and contrast on your own monitor screen. After completing a design, you should purchase small amounts of yarn or floss initially, to see them yourself and verify they are what you want, before you purchase large amounts.
In the case of this rug, I am pretty sure that the white available from Herrschner’s will be a reasonable white for the rug, the red, yellow and aqua will probably be OK. But I am not sure about the blues. I want them to be pretty close to the original quilt color. After purchasing a few different blues from Herrschner’s, I decided on dark cornflower for the edging and left the color of the letter I as light cornflower.
I used 5 mesh rug canvas (5 holes/inch) purchased from colorcrazy.com. Using the tighter mesh (usually 3.75 holes/inch is used for kits, etc) and the Herrschner’s precut rug yarn, the rug has a very nice dense feel. More info on using 5 mesh canvas and tools can be found here: https://www.freese-works.com/latch-hook-5-mesh-tools-review/. Herrschner’s precut yarn can be purchased here: https://www.herrschners.com/herrschners-pre-cut-latch-hook-rug-yarn/
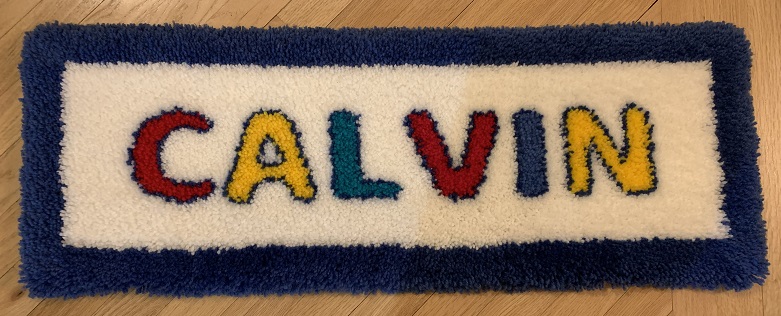
Working the Rug
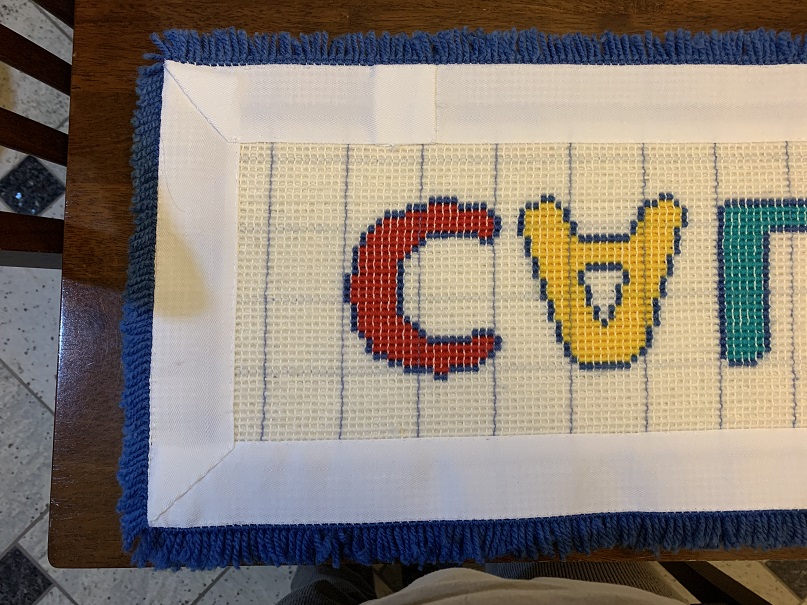
I worked the rug largely on my lap with the TV on. Finished the back with 2 inch binding, as described in this YouTube video. It took a couple of weeks for the latch hooking and one evening to bind the back. I was very happy with the use of the 5 mesh canvas, the rug is dense and soft. The only thing I was not sure of was whether I should have put a thicker edge on the letters. With only a single line of blue around the letters, there is some mixing of the white and letter color with the border. Perhaps it should have been a wider edge of blue on each letter?
Completed Project
Here is the finished rug, front and back (below).
My grandson seemed quite happy with it! Here he is jumping up and down.
He saw it several times while I was working on it. He loved to run his hands over the yarn, it felt so soft. Then he would say, “More, more” and point to the edges where there needed to be more yarn, until it was finally filled in and done!
More Info
See the Overview playlist on youTube for more information on the Grid Designer.
If you are ready to start the Grid Designer to create your own project, click here.
As always, if you have any questions or comments, leave me a message below or go to my contact page to email me.
Rugs from Grid Designer Users
I would love to see designs and rugs from everyone!
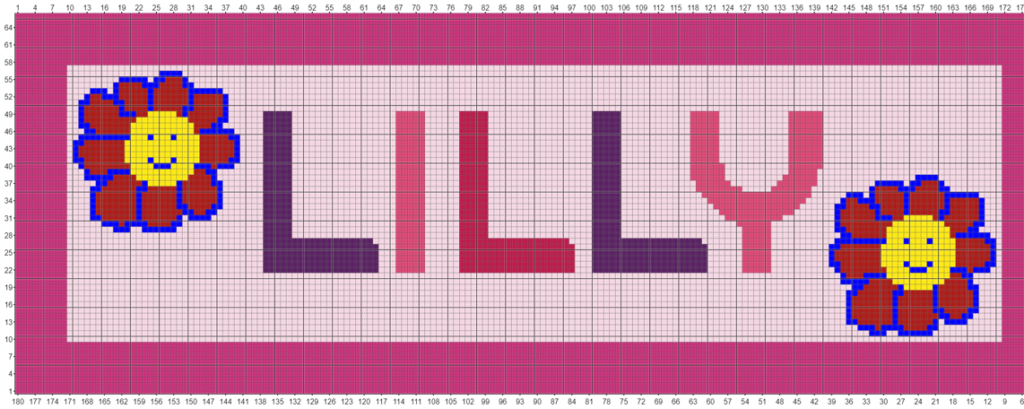
Here is a really cute rug design from Sheri. Love the flowers!
If you have an image to share, send me a note on my contact page to get my email address. Then, send me a picture of your own design and I will place it here!
You hit the nail on the head.I’ve been looking for away to put letters on latch hooks.
You might want to take a look at the YouTube video also. I have a pretty good selection of fonts, even some cursive fonts and an Old English font.
https://www.youtube.com/watch?v=kEz-fUrZB5I
Where can I get the program to do this? My grandkids would love these rugs.
Hi Tammie, the Grid Designer program runs for free in your browser. To load the pattern, click this link (this is also in the text above, I will try to make it more visible), then click the Load Pattern link in the resulting page. The Grid Designer will come up in your browser and will ask you if you want to load the pattern. Click Load. Look at this video in YouTube for how to change the name, etc. youtube video
what type of canvas did you use?
I purchased 5 holes/inch canvas from colorcrazy.com. More info on using 5 holes/inch canvas in this post: https://www.freese-works.com/latch-hook-5-mesh-tools-review/
I have updated the post text above to add the information on canvas type for the next person. Thank you so much for your question! If you make a rug I would love to see it and possibly post a picture of in here, with your permission. Have a great day!
I have updated the text on the page to put more links to the youtube video “Customize Children’s Name Rug Pattern” on youtube, so this won’t be as confusing for the next person. Thanks for your question! If you are interested in sharing pictures of your finished rugs, I would love to see them, and possibly post them here with your permission. You can get in touch with me by email on my contact page, just click the contact tab at the very top of this page.
Wow this is fantastic. Can’t wait to make one for a colleagues son. Thanks lot for the idea. Haven’t clicked on the link yet but will do it soonn
Thanks! If you have any questions feel free to send me an email through the contact page. Click the Contact tab at the top of any page.