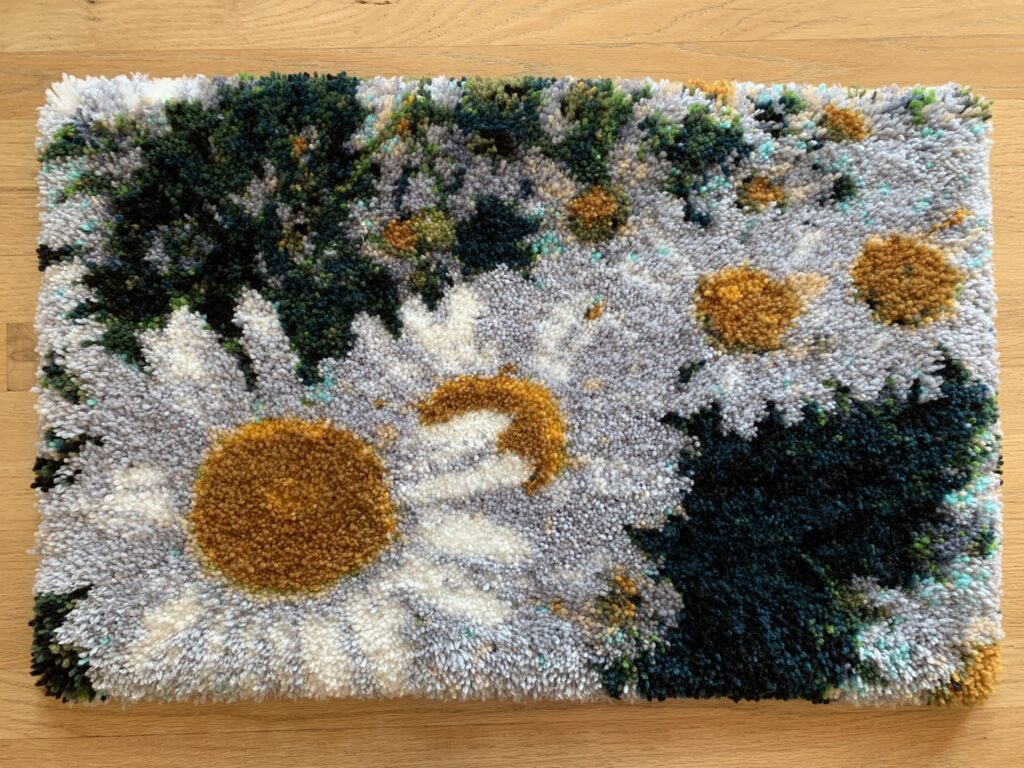
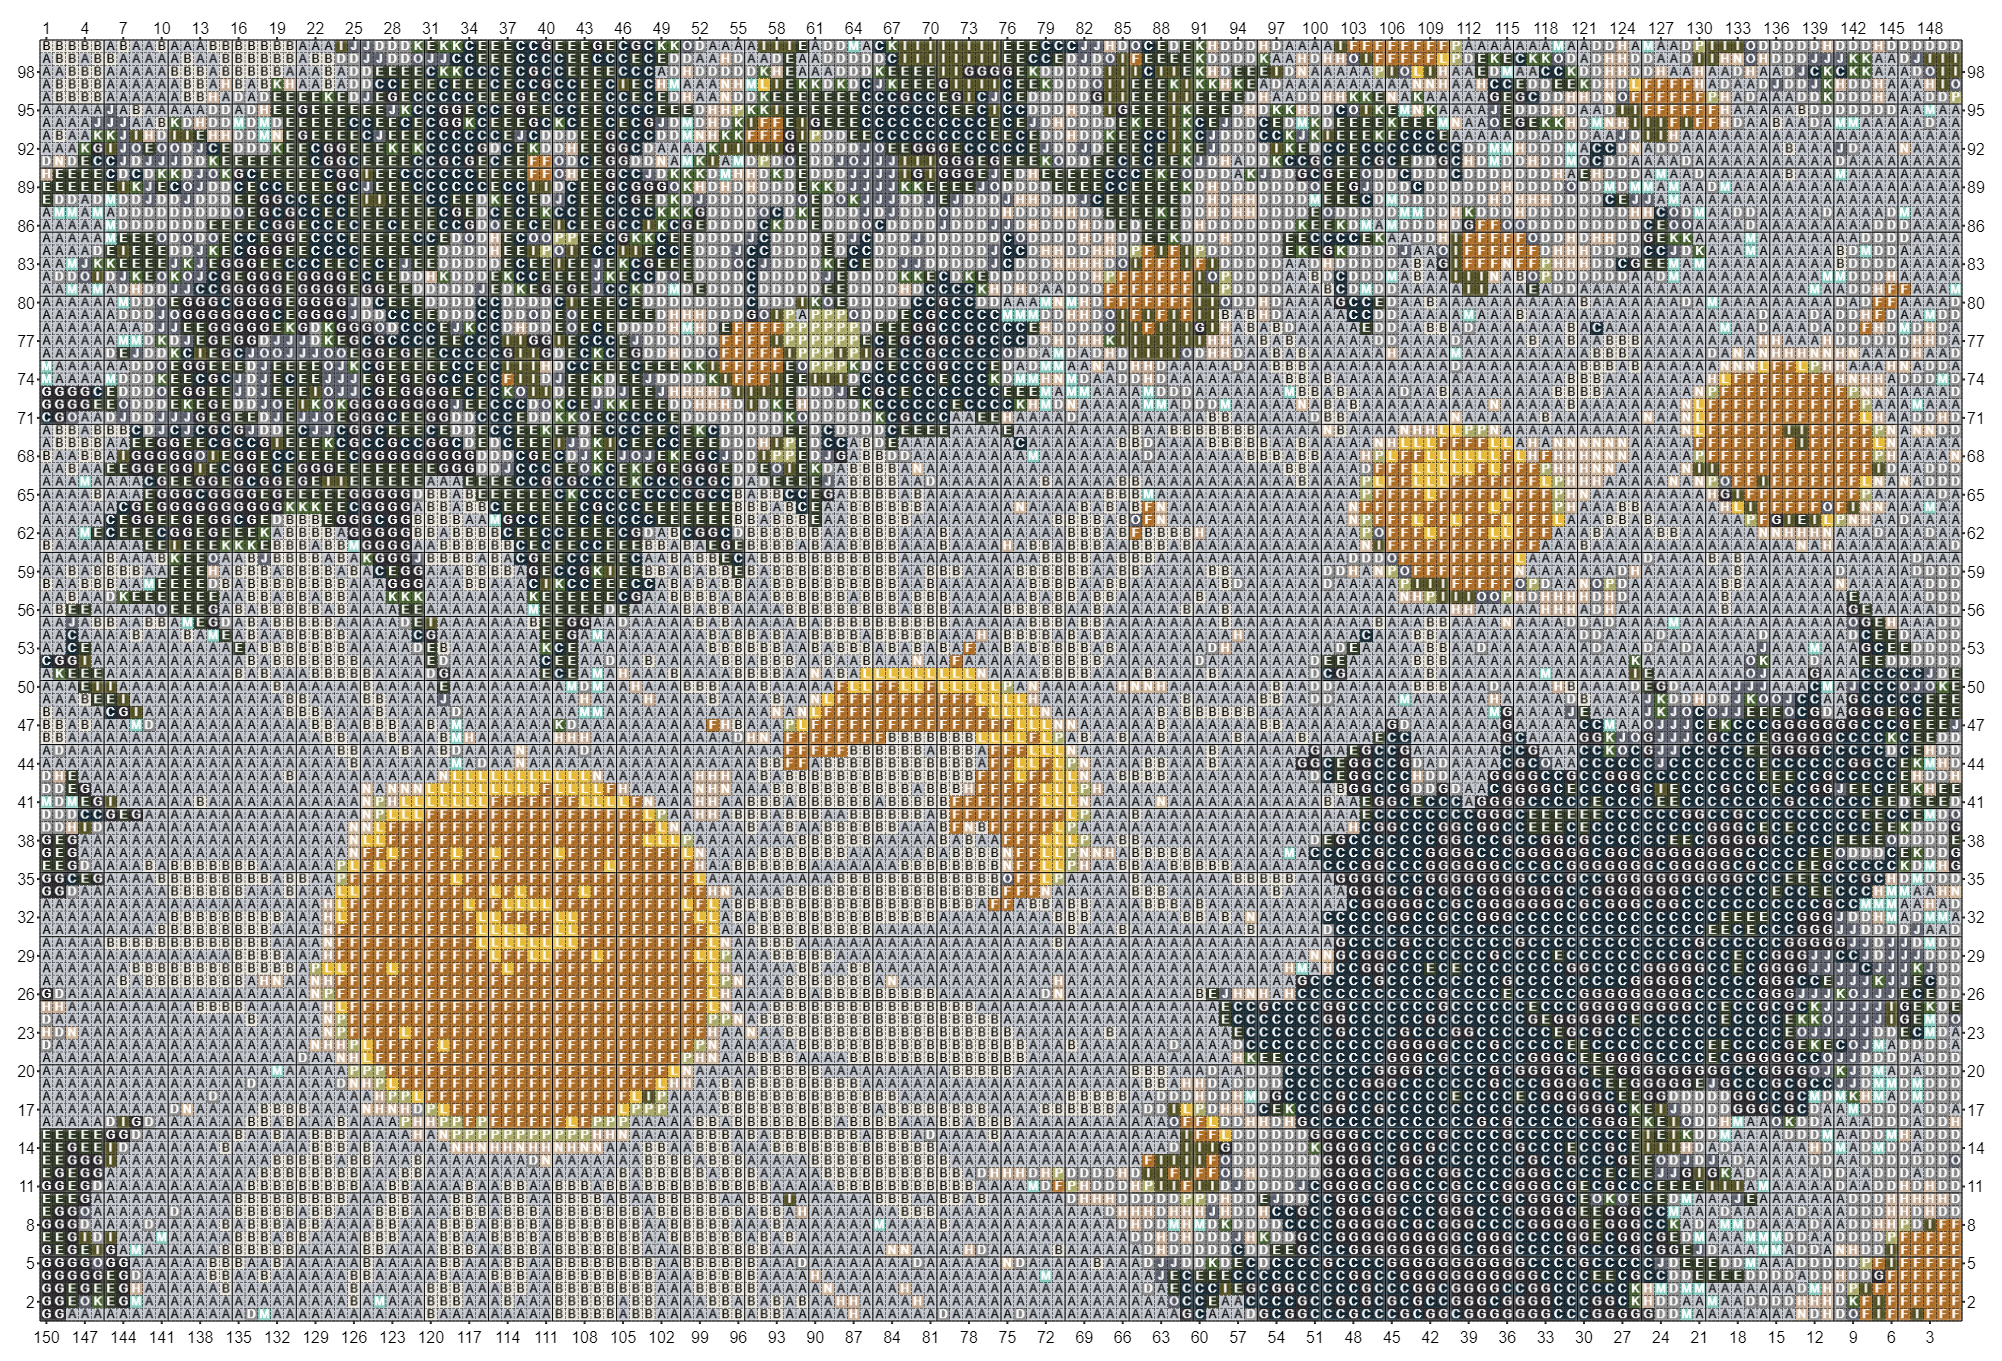
I created this Shady Daisies rug from my own photo using the Grid Designer! You can also create your own projects from your own photos using the Grid Designer, see the How to Create a Latch-Hook Rug Pattern from an Image section below. Or, to download the free latch hook pattern see the Free Pattern Download section below.
Free Pattern Download
If you are not interested in creating your own pattern, but want a copy of the Shady Daisies pattern, the pattern is free to anyone for personal, non-commercial use. There are two ways to get the pattern:
- Download a single image of the pattern by clicking here. The pattern color key can be downloaded by clicking here. Or you can…
- Load the pattern into the Grid Designer and use its print and download methods to print the pattern as you would like to have it. When I worked on it, I just used the Grid Designer Project > Print option to print the pattern onto multiple pages. To load the pattern into Grid Designer just:
- click this link,
- then click “Load Project” in the page that follows and
- click the Load button in the Grid Designer to open the project when Grid Designer prompts you.
- You can then edit, save, print, or download the project using the Grid Designer. See the Print and Download YouTube video for more information or read the Printing the Project section.
Be aware that in the final project I substituted Light Grey Super Saver yarn that I cut myself for the pre-cut Herrschner’s Gray yarn used in the pattern. For more details on that, you can continue reading with the Purchasing Materials section.
The final materials list is here.
See the Overview YouTube playlist for more info on editing in the Grid Designer.
How to Create a Latch-Hook Rug Pattern from an Image
To see how I created the pattern in the Grid Designer from a photo, watch my YouTube video by clicking this link.
You can create your own pattern from any photo or image using the Grid Designer’s “Create from Image” option. The “Create from Image” option is located under the Project menu. Documentation for the “Create from Image” option is located here.
Open the Grid Designer by clicking this link to go directly to the Grid Designer, if you choose, or read on for more information.
Creating the Shady Daisies Pattern
The Photo
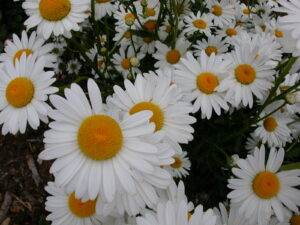
I started with this photo taken in my yard several years ago. We have daisies all over the yard and I love them.
I particularly liked this photo because of the line of daisies that moves from the front-left of the photo to the back-right of the photo. It seemed to me that this would make a nice latch-hook rug if I could cut out this portion of the picture.
I then used Grid Designer to crop and digitize this photo into a pattern sized to make a 30 x 20 inch latch hook rug when using 5-mesh canvas.
Load and Edit the Photo
All the details of creating the pattern with the Grid Designer are shown in the YouTube Video: Overview – Create a Project from an Image in the Grid Designer. If you are not interested in watching a video, I will also describe the basics of how to digitize a photo with the Grid Designer in this section. You can choose to either watch the video or read the text.
Load the Image
- Make sure the photo/image is located on the device you are running your browser on.
- Start the Grid Designer at www.freese-works.com/griddesigner.
- Click on the Project menu on the left of the top toolbar. A menu will drop down.
- Select “Create from Image” from the menu. A dialog will popup.
- Click on “Select Image”. Select your image from your device using the browser’s dialog, and click the Open button.
- The image should now be loaded and showing on the upper left of the Grid Designer’s dialog.
You can now edit the image with the buttons below it, if you need or want to make changes to the image.
Edit the Image
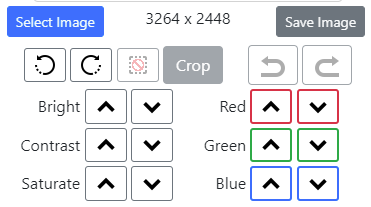
Any changes you make to the image can be saved back to a file on your device with the Save Image button.
Any changes you make can be undone/redone with the undo/redo buttons under the Save Image button.
Rotate the image with the rotate left and right buttons under the Select Image button.
Crop the image by drawing a rectangle on the image itself with your mouse. If you are on an iphone or ipad, click in two spots to define opposite corners of a rectangle on the image. Then click the Crop button. There is also a button to clear the rectangle selection.
Change brightness, contrast, saturation or increase/decrease the amount of red, green and blue in the image with the buttons farther down.
Filter the Image
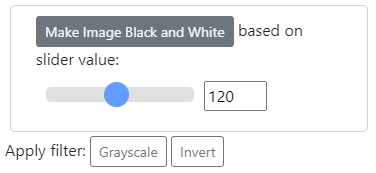
On the bottom left side, there is also an area where you can apply filters to the image.
To make the image black and white, click the Make Image Black and White button. Change the slider position to make the image lighter or darker. Darker to the left, lighter to the right. Undo your Black and White image before trying another one with the slider in a different position!
You can also turn the image into a grayscale image or invert the colors in the image with the filter buttons below. I will be adding more filters in the future. If there is something you would like the Grid Designer to be able to do to the image, leave me a comment below!
If you like your edits, be sure and save the edited image to your device with the Save Image button. Then, you can always reload it later!
Digitize the Image
To digitize the image correctly for your craft, two things are needed:
- A color palette – this will provide the colors we will use for digitizing.
- Sizing information – this will provide sizing information that will determine the size of your project in real world terms. It is not absolutely required, but is very helpful.
Select a Palette
First, we will select a palette. This will allow the digitizer to start working.
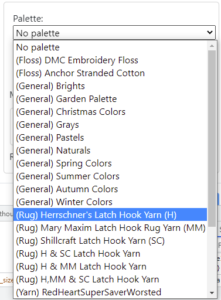
For my Shady Daisies pattern, I selected Herrschner’s pre-cut rug yarn.
The palette selection is provided by the Palette dropdown in the center of the right side of the dialog. Simply select the type of yarn you want to use.
Three varieties of pre-cut yarn are available: Herrschner’s, Mary Maxim and Shillcraft, as well as combination palettes of those yarns. Many popular worsted weight yarns that can be used for latch hook are also provided in the palette.
If you do cross-stitch, DMC and Anchor embroidery floss are also available. I will be adding more color palettes as I go along. If there is a particular yarn you use, let me know in the comments section below! I can add it. I can also add combination palettes if there are combinations of yarn that you commonly work with.
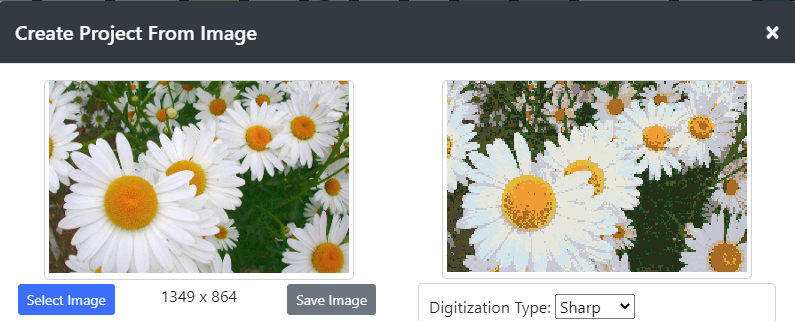
When the palette is selected, the digitized picture on the upper right of the dialog will begin drawing. You can continue to make changes to your image, such as adjusting the brightness, etc. The digitized image will update as you make changes.
Set Sizing Information
Sizing information is not absolutely required. Once the palette is selected, you can use the digitized picture to create a project at any time. But, it can be helpful to determine the number of rows and columns you wish to have in your final project, if you know the real-world-size of that project.
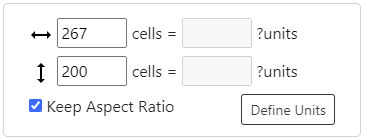
Sizing information is set by selecting the Define Units button in the sizing area on the right side of the dialog.
For the Shady Daisies project, I clicked the Define Units button. This brought up a separate dialog where I could select my project type: latch-hook.
Then I could select a 5-mesh canvas, which is all I need to do to define the real-world size of the pattern. Selecting the Save button brings me back to the digitizer dialog. Now the real world units are set.
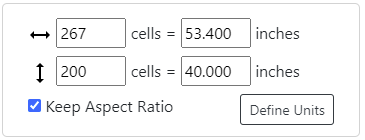
Now you can change either the number cells or the number of inches in either direction. The other numbers will recalculate when you make changes. Turning off the Keep Aspect Ratio checkbox will cause the digitized image to stretch to fit.
For example, 53 x 40 inches, would be too large to reasonably work, but if I change the 53.4 inches value to 30 inches, the other values will be recalculated.
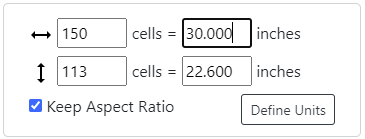
Turning off the Keep Aspect Ratio check box will allow me to type anything that I want for either side. For instance, I could then enter 20 inches for the vertical direction and the digitizer would shrink that side by 2 inches making the picture appear slightly stretched in the horizontal direction.
Fine Tune
Now that the palette is set and the sizing information is in place, we can fine tune the picture. Here are some of the things you can change:
- Reduce the number of colors used – below the palette selection you can set the maximum number of colors to use
- Reduce the number of colors used in only a few cells – Set the “Remove colors used in N cells or less” to a higher value if you have lots of colors used in only a few cells.
- Set the digitizer type – You can select from Sharp, Smooth and Block. Try them out to see how they work with your image.
- Continue to change settings on your original image on the left to see how that affects the digitized image on the right.
When you have the digitized image as you would like, press the Create Project button to create the project in the Grid Designer. Save it by going to the Project > Save option.
Printing the Project
Detailed information for printing and downloading images of your project are provided in the Printing and Download Grid Designer YouTube Video. I provide some basic instructions here, if you do not want to watch the video.
For my Shady Daisy project, I simply printed the project with the Project > Print option. You can also use the Project > Download option to download an image of your colored grid to your device and print it using another image editing tool.
Purchasing Materials
The next step would be to purchase materials to start your project.
Purchasing 5-Mesh Canvas
I have learned to purchase quality canvas. In another project, I purchased 5-mesh from joAnn Fabrics and was very disappointed. I experienced a lot of breakage on the canvas, even with the 5-mesh tool they provided. I will not purchase from there again.
Color Crazy has quality 5-mesh canvas that I had previously used. I purchased from them again and had no problems, of course it costs more, but it’s worth it. They also sell on Amazon. I also purchased their 5-mesh tool. It was much easier to use than the one I purchased from joAnn fabrics. Small changes make a big difference. I will have to write a post on the difference in 5-mesh tools!
I purchased one yard of 5-mesh from them that was 40 inches wide and cut this to 34 by 24 inches. To work correctly on the untwisted strands you need to cut the 34 inches out of the 40 inch width. Then you will be working the correct way on the 5-mesh.
Purchasing Yarn
If you are creating your own project from a photo, keep in mind that yarn can look different in your hand than it looks on the computer screen. Lots of factors go into the colors you see on your screen, photography lighting, display differences, brightness settings on your monitor. I usually work with two monitors and have noticed that blue always looks a bit purple on one monitor and not on the other.
In any case, proceed cautiously, if you are creating your own pattern from a photo. For my Shady Daisy pattern, I purchased one packet of each of the 16 colors in the project to start with.
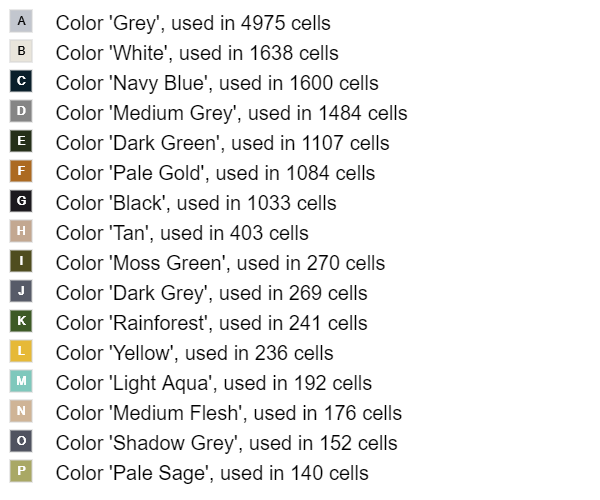
To see the list of colors in the project, you can go to the Project > Project Info option in the Grid Designer. This will show you a list of all the colors in your project and tell you how many cells use those colors. This same list is also printable and downloadable as part of the print and download options in the Grid Designer.
I then worked a small area of the pattern to start with to see if I liked the colors in person. As it turned out, I felt that the Herrschner’s Grey pre-cut yarn was a little too dark for the pattern. It looked too close to the next darker grey, which was labeled medium grey.
I then looked around for a light grey in the pre-cut yarn and could not find one! There does not appear to be a light grey in pre-cut yarn! So, I substituted Red Heart Super Saver yarn in Light Grey for this color. I used a strip of cardboard to wrap the yarn around to cut it. I had to experiment with the size of the cardboard to get my cut yarn to be the same size as the other pre-cut yarn from Herrschner’s. My husband then cut the yarn for me, that was a great help!
Materials List
If you are looking to just work the free latch hook pattern in the same way I did, here is the materials list:
- One 7 oz skein of Red Heart Super Saver yarn in Light Grey (preferred) OR 16 packets of Herrschner’s pre-cut yarn in Gray. Herrschner’s will be darker, but I think it could still be used if you don’t want to cut yarn.
- 6 packets of Herrschner’s pre-cut yarn in White.
- 5 packets of Herrschner’s pre-cut yarn in each of Navy Blue and Medium Grey
- 4 packets of Herrschner’s pre-cut yarn in each of Dark Green, Pale Gold, and Black
- 2 packets of Herrschner’s pre-cut yarn in Tan
- 1 packet of Herrschner’s pre-cut yarn in each of Moss Green, Dark Grey, Rainforest, Yellow, LightAqua, Medium Flesh, Shadow Grey, and Pale Sage.
- One yard of 5-mesh from Color Crazy, cut down to 34 x 24 inches for a 30 x 20 rug.
- Three yards of 2 inch rug binding for the back
- Needle and thread for sewing the binding to the back
Finishing Up
It took about 2 weeks to do all the latch-hooking. Keep in mind that I am retired and I did this several hours each day.
It took one evening to sew the binding on the back. I trimmed the edges to one inch and followed instructions from Utterly Hooked on this video for sewing the binding on.
Please let me know if you have any questions by commenting below!
More Info
See the Overview playlist on youTube for more information on the Grid Designer.
If you are ready to start the Grid Designer to create your own project, click here.
As always, if you have any questions or comments, leave me a message below or go to my contact page to email me.